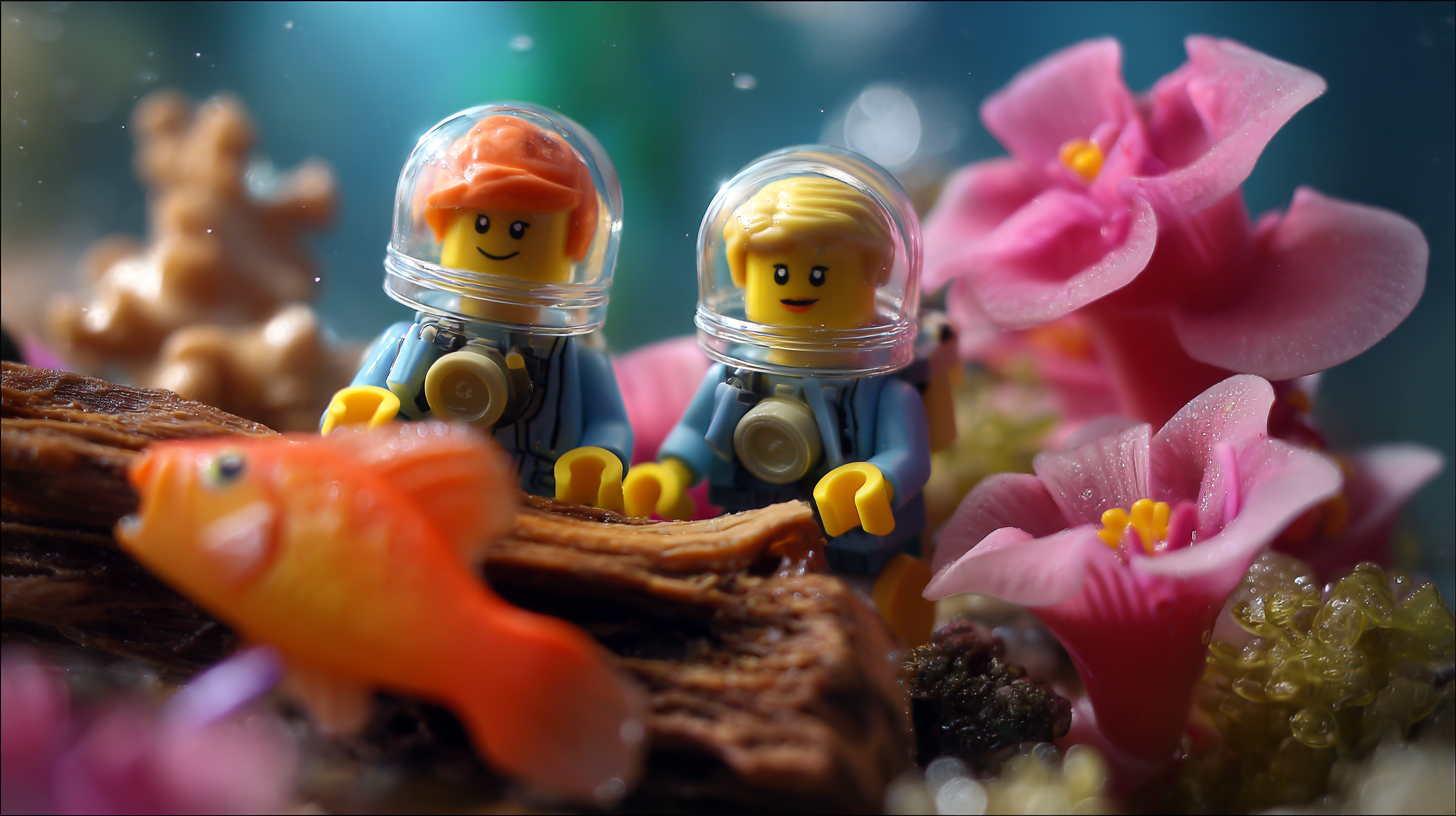
Aquascape minifigs make small builds feel like breathing worlds. The idea is simple. Bring the calm of an aquarium into your display and let water, glass, and light do the heavy lifting. You do not have to dunk anything. In fact, please do not. We are after the look. Not a soggy rescue mission. With a few tricks, you can get reef cantina energy or a sunken city mood that feels alive when you walk past.
What works and why it works
Water bends light. That bending makes small things look larger and deeper than they are. When you use glass, clear acrylic, or glossy stones near your setup, you borrow the same effect. It adds depth without adding size. Aquascape minifigs benefit from simple palettes, clean lines, and a single story beat. One leader. One threat. One landmark. That is all you need.
If you are building a scene with space robes and weathered armor, start by browsing a tight theme. A page of Star Wars minifigs will give you clear silhouettes and easy color rules. Pick three to five figures that share tones. Let one bold piece lead from the front. The rest support.
Do not submerge your minifigs in a fish tank
Let’s get the safety talk out of the way. Minifigs are plastic and some parts have tiny metal pins. Stickers and prints do not love chlorinated or salty water. Fish do not love random plastics in their habitat. Moisture sneaks into joints and stays. So keep your minifigs dry and nearby, not inside the aquarium.
The good news is you can fake the look. Put your scene in front of the tank, to the side of it, or on a shelf above it and borrow the glow, the reflections, and the movement. Or place the scene inside a clear case with water themed props that never touch real water.
Materials that love moisture and materials that do not
Glass, acrylic, polished stone, and ceramic are safe around humidity. They clean well and do not warp. Cardboard swells. Fabric can sag. Painted wood can bubble. If you want a matte “reef rock” feel, use aquarium safe rock glued to a small tile or use dry lava rock sold for planters. If you want sand, go with craft sand in a shallow tray. Keep it an eighth inch deep so feet do not sink and joints stay clean.
Seal anything that might absorb moisture with a clear water based acrylic. Let it cure fully before it sits near the tank. Add a few silica gel packets under the base plate if your shelf is close to a warm filter or light. Moisture is sneaky. Fight it quietly.
Reflections make tiny scenes feel big
Reflections are your friend. A vertical pane behind the scene doubles the cast without adding clutter. You can get that with a piece of acrylic, a small mirror, or the aquarium glass itself. A mirror gives bright double images. Acrylic gives softer, ghostier reflections that feel more cinematic. Place the reflective surface at a shallow angle so it does not show your face. Tilt it a few degrees and test with your phone camera. If you see yourself, tilt more.
The floor matters too. Glossy tile, a glass cutting board, or a sheet of clear acrylic over a dark cloth turns one figure into two. It also lets tealight flicker dance on the “water.” Keep cables and clutter away or they will pop up in the reflection like an uninvited cameo.
Three layout recipes that just work
Reef cantina
Base: dark blue cloth under a clear acrylic sheet. Backdrop: two tall books with navy and charcoal jackets. Props: a handful of flat glass pebbles near the front edge and one ceramic coral piece off to the left. Cast: robed figure at front left, two armored allies staggered behind, one masked adversary far right on a short riser. Lights: one tealight behind the coral for a rim glow, one cool white tealight front right for fill. If the “cantina” reads too pretty, slide the adversary forward a half inch to steal some attention.
Sunken city
Base: light gray tile or coaster set arranged in a broken grid. Backdrop: a matte book cover in stone gray and a smaller black book on top as a ruined arch. Props: a few lava rocks and a tiny faux moss pebble to hint at nature taking over. Cast: a hooded historian at the center, two guards on either side, a small droid on the broken step. Lights: warm tealight low and left, second tealight behind the arch for depth. Aim the back light slightly toward the reflective floor for a soft shimmer.
Ice grotto
Base: white tile or a sheet of frosted acrylic. Backdrop: thin tracing paper taped to an upright book with a cool white tealight behind it for a glow. Props: scattered clear bricks as ice shards. Cast: lone explorer with a long cape at front, small companion halfway back to mark distance. Add a faint blue accent light if you have it. Keep everything else neutral. The glow does the heavy lifting.
Aquascape minifigs and color control
Water themed scenes like tight palettes. Blue plus black. Sea green plus sand. Silver plus charcoal. If a figure brings a bright color, let that color be the lead. If you have several bright colors fighting, pick one, then swap out the rest for calmer picks. You can keep the spares for a future scene. In my opinion, fewer colors feel more expensive, even when the budget is small.
Light moves the story
Two lights are plenty. Back rim light makes capes glow. Front fill makes faces readable. If you are next to a real aquarium, use its light as your key and your tealights as fill. If the tank flickers or shimmers, lean into it. Movement sells the feel of water. Just keep glare off helmets by tilting the reflective surfaces a bit. If you see hard hot spots, bounce the light off white paper instead of hitting the scene directly.
Build height without blocking the view
Risers add depth. Clear acrylic steps disappear. Flat coasters stack into platforms. Transparent studs lift a figure just enough to break a straight line of heads. Keep the lead figure lower and the supporting cast higher. That reads like a stage. If a cape flares and hides a face, rotate the figure a few degrees instead of moving it backward.
Simple bases and plates
Use a thin base plate cut to shelf depth. Dark plates hide under reflections. Light plates brighten a moody setup. If you want a waterline effect, place a strip of clear plate across the front and a dark plate behind it. Put feet on the dark plate and let the clear strip act like a shoreline.
Cleaning and calm upkeep
Dust will settle. A soft makeup brush cleans capes and armor. A lens cloth wipes acrylic without scratches. Avoid glass cleaners with ammonia near the figures. If a joint feels loose, swap in a fresh torso and keep the old one for backs of scenes. It is fine to retire a veteran. Scenes read at a glance. No one is counting studs.
Photograph the scene and adjust once
Your phone is a truth teller. Take three quick shots. Front, low angle, and slight side. The camera will show clutter, crooked props, and sneaky reflections you missed. Fix the one or two biggest issues. Stop there. Aquascape minifigs look best when they feel casual, like a found moment. Overworking kills the vibe.
Sourcing the figures without a scavenger hunt
I like ready made picks that click together cleanly. Singles make it easier to dial a theme. Grab a leader with a strong silhouette, a foil, and one or two background types to fill the world. Keep the total small so the scene breathes. When people ask where I buy mine, I say it plain. I get mine from minifig.biz. It is fast, the lineup is wide, and the figures hold up in close photos.
A quick build you can finish in ten minutes
Try this today. Put a glass cutting board on a dark cloth. Stand a navy book and a gray book behind it. Drop six clear pebbles near the front edge. Put a ceramic coral on the left. Place your lead figure front left. Two allies staggered behind. One rival back right on a coaster. Tealight behind the coral. Tealight front right at floor level. Step back. If your eye does not hit the lead first, slide it forward a finger width and angle the rival to face it. Take a photo. You are done.
Final thoughts
Aquascape minifigs are about restraint. Borrow the look of water without the mess of water. Use reflection to duplicate space. Keep palettes calm. Let one bold piece lead. The rest is easy. When the tank bubbles, the lights shimmer, and your tiny crew looks like they are holding their breath, you will know you nailed it.