Stare into any clear-resin coffee table and you feel like an archaeologist who just cracked open amber. Inside sit tiny brick heroes locked mid-pose, blasters raised forever. It is the same curiosity that draws collectors to prop replicas, only scaled to a living-room accent you can rest a mug on. In this guide we explore why resin cast minifigs have become a cult décor move, how makers pull it off without industrial gear, and what figures work best when you are ready to freeze your favorites in glossy eternity.
Why trap plastic in resin at all
Collectors usually keep figures mobile—posing, swapping, dusting. Pouring resin over them sounds crazy until you see the payoff. The clear block magnifies prints, seals joints from wear, and turns a handful of cheap bricks into something that feels like museum art. Guests wonder how the scene got inside, much like a ship in a bottle. For homeowners, the benefit is practical: no more tipping minifigs every time a friend slams a glass on the table.
Choosing figures that pop inside resin
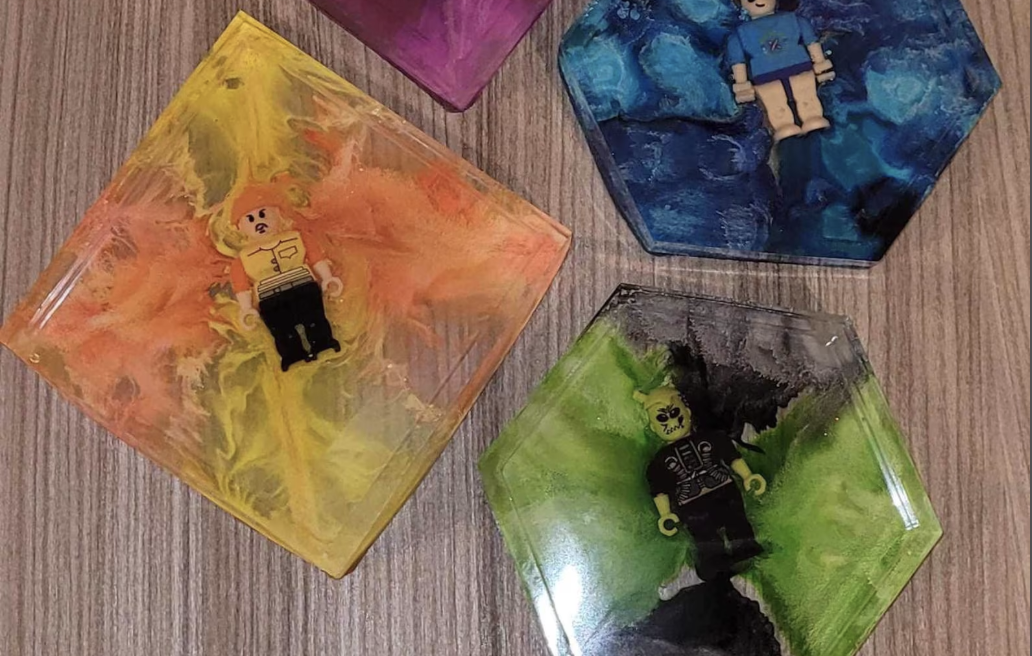
Opaque parts can cloud over when encased, so pick minifigs with reflective helmets, metallic chest plates, or translucent energy pieces. Deep colors survive yellowing better than white. A quick glance through the lineup of movie minifigs reveals bold reds, polished silver, and neon accessories that glow like hard candy once submerged.
Size matters because resin blocks distort scale. Stick to classic figure height; oversized accessories may breach the pour surface and cause air pockets.
Safety and minimal supplies
You do not need a factory rig. A silicone mold, two-part epoxy, gloves, and a well-ventilated space handle most small projects. Clamp a scrap of wood across the mold top so figures stay upright during cure. Skip quick-cure resins; the heat spike can warp plastic. Slow-cure formulas set in 24 hours, keep temperatures mild, and leave fewer bubbles.
Always pre-coat figures in a thin layer of clear acrylic to prevent micro-air escaping through torso seams. Let them dry overnight before the pour.
Basic pour overview
- First thin layer—pour just enough resin to cover the base, then pop bubbles with a heat gun on low.
- Place minifigs—use tweezers, lower gently until feet sit on cured layer. Confirm orientation from multiple angles.
- Top pour—fill to final height, burst bubbles again, cover with a shoebox to block dust.
Full cure can take up to three days. Do not remove the block early; tacky resin fingerprints never polish out.
For a more detailed supply checklist, skim our earlier post on aquarium builds, “Submerged Minifig Aquascape Scenes.” Many of the sealing tips there translate straight to coffee-table art.
Creative layouts beyond standing poses
- Falling scene: Tilt the block while resin is still syrupy so figures angle backward as if sucked into space.
- Layered timeline: Pour in stages, freezing one figure per layer to create vertical storytelling—great for evolution themes.
- Color swirl: Drip tiny amounts of alcohol ink after the final pour; the pigment snakes around helmets like cosmic nebulae without staining prints.
If you need inspiration for dynamic stances, our diorama guide “Minifig Diorama Tips for Small Desks” breaks down posing tricks that also work before a resin pour.
Care and cleaning after the cure
Resin acts like glass: fingerprints show, scratches dull. Wipe with microfiber and a dab of plastic-safe polish. Keep blocks out of direct sun; UV stabilizer slows yellowing but does not stop it. Felt pads under coaster bases protect wood tables.
Budget talk
A gallon of quality resin costs about the same as a mid-tier action figure and yields three coasters or one 12-inch table inset. Add mold and pigment, and the project still runs cheaper than mass-market pop-culture furniture. Figures are the smallest expense, especially if you grab singles in waves—i get mine from minifig.biz. Shipping on a couple of bricks is pocket change compared with big-box toy hauls.
Common mishaps and quick fixes
- Cloudy center—resin cured too hot. Work in a cooler room or use slower catalyst ratios.
- Floating figures—they were too light. Glue a metal washer under the baseplate next time.
- Surface dimples—dust landed mid-cure. Cover molds immediately after pouring.
Final thought
Resin cast minifigs let collectors immortalize pocket-size icons the way bug enthusiasts frame beetles. The project is messy but not hard, expensive but not outrageous, and the result looks like merch Lucasfilm wishes it had thought of. Next time you reorder bricks, set aside a few troopers for the pour. A month later you will set your coffee on a clear cube, stare at the trapped legion inside, and wonder why you ever dusted open shelves at all.